Thursday 29 October 2009

Finished Simplicity 9769

With somewhere to go tomorrow, as Mr Marmalade and I are off to London for a long overdue weekend of fun and frolicks. I can't wait! It will be nice to have some down time after the hectic last few months..


Katie is also dressed up and ready to go to her new home on Monday.

We had a little photoshoot today - the location isn't really glamorous enough, but it's all I can manage today...

She could do with a bit more padding on the hips - there's still a bit of room in there!


Thank you for all your questions in response to my last post! You might get more than you bargained for with my answers, but I shall endeavour to answer them in my next post - after the weekend. In the meantime, I will have to ask Mr M to photograph all my tattoos!

TTFN!

Monday 26 October 2009

Chicken wire corset mannequin

or... how to make a corset mannequin with chicken wire and modrock!


The trouble with the usual type of mannequin or dress form is that they are too solid to model a corset - no 'squish' factor. To display corsets therefore, you can either use a couple of pillows like this ...

Or you can make a bust. The pillow option is ridiculously expensive as you need quite puffy feather pillows which are expensive. So I figured (haha!) i'd have to do something different for my shelf in Antiques on High. I had some chicken wire in the shed, so I rolled it up into a tube and tried to shape it ... without much success. It's quite 'bouncy' and I couldn't really make up my mind where the curves should go to start with. So I let the corset do the moulding - just as it would do on a person..


After much wrestling I managed to tie the corset around the chicken wire tube - corsets are quite springy too! Then after tightening the back laces quite gradually, I then modelled the wire from the inside.

With a bit of artistic 'scrunching' at the top and bottom, the thing took shape - the corset here isn't quite finished, so I had to be a bit careful with the stray bits of wire poking out from the chicken mesh.
I fancied a bit of a play with some Modrock, though really i'm not sure the bust needs it. It will add stability and a bit of strength anyway, and OH! what FUN!! Squidgy, squadgy bandages! I found it quite meditative when smoothing them over the form..

So here is 'Katie'! Don't ask me why her name is Katie, it just is .. And currently, she is 'drying' in the shed after having been sprayed with a whole can of paint. Stay tuned to find out What Katie did Next!


Sunday 25 October 2009

Corset Construction Part 3

As you know, I've been making a 'display' corset from one of the patterns I'm offering for sale as part of a kit. The Simplicity 9769. It's a while since I posted parts ONE and TWO - just click on those links to catch up. At this stage, there are only a few things left to do, but these are the most time consuming! First, the bones need to go in...

There are 20 flat steel bones in this model. These "bones" are made from flattened steel springs which are then coated in plastic - this gives them the flexibility they require in order to mold your body - note: the bones mold your body, not the other way around! No need to use spiral bones as there are no 'horizontal' type curves - ie: the curves go straight up and down.

After the bones are all inserted, the trim needs to go on - I decided to trim a few of the bone channels - hence it goes on after the bones (so you don't sew through the bone channels!) and before the binding (to get a neat finish).


I've had this trim for AGES AND AGES! It's been waiting for just the right project, and I think this is it! It's a Victorian style daisy guipre trim.

Now it's time to bind the top and bottom. This can be done either with bias binding cut from your original fabric, or a contrasting satin bias binding ready made.

This is acetate satin binding. It goes on the top and bottom edges of the corset. This is where my sewing room turns into the "House of Flying Needles" !!


I broke FIVE needles doing this part - my own fault entirely, not paying enough attention. I forgot to move the bones up while I was sewing each respective edge. Humph. As you can see i'm using "sharps". These are special sharp needles, perfect for topstitching all those bone channels and layers. The underside of the binding now needs to be handstitched on the reverse.

Now ... what to do with it??


It's still not finished (binding to be handstitched), and it doesn't float! I needed to make a bust for the display which sort of happened in the middle of things!

Tuesday 13 October 2009

Corset Construction (part 2)


Making a corset takes time and precision, but as long as care is taken over each step, it's not difficult. Today I spent time on the bone channels which are placed over the seams. It took all afternoon just to do one side of the corset, but I am pleased with the results.

The pattern instructions say that the seams should be 'flat felled' and then the boning tape sewn on, but this leads to a very messy effect on the right side, so I don't follow the instructions to the letter. Here is an example - this is the very first corset I ever made (with the Simplicity pattern) - I've kept it for reference!

You can see how wiggly the lines are, and how messy it looks. So what I do now, is trim one side of the seam right down, then fold the other side over it - like a flat felled seam, but then I baste the boning tape right over it, and sew in one step.


It would ofcourse be much easier to press the seam open and sew the tape over that, but this method would not result in a very strong seam - these seams have to take a lot of pressure! The last thing I want is for them to burst open while I'm wearing it!!! That just wouldn't do now would it! ?

I line the boning channel up over the folded seam, and just over the original seam line so that I can 'stitch in the ditch' from the right side, catching just enough of the tape...

I know that when I turn the corset around to sew the other side of the channel, if I line the left side of my presser foot up with the line I have just sewn (in this case, the 'ditch'), the needle is in exactly the right position to sew the exact width I need in order to be able to slide the bone in very snugly.


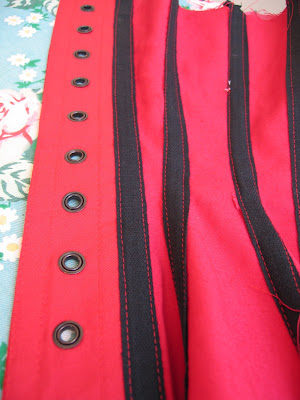
Here's what it looks like on the other side - and you can see that i've finished off the outer edge by placing bone tape over the back facing to give a neat finish.

The finished side is then zigzagged on the top edge so that it doesn't fray, and the bottom edge is left open so that I can slide the bones in.

I will sew the bone channels on the other side tomorrow, in the same manner, then add some more eyelets to each side, insert the bones, bind the tops and bottoms with bias binding, and embellish.

Monday 12 October 2009

Corset Construction (part 1)

Here as promised, is my "quick guide" to building a corset. This is based on the 9769 Simplicity Pattern which I am making for display purposes - more on that soon (hopefully)!! This is a quick guide - an overview ... I have put links in where you can see italics, to my 'tips and tutorials' pages on the website where there is more detailed info.

First of all, this pattern reduces the waist automatically, by 2.5 inches. But I need a bigger reduction than that, so I start off by tracing the pattern, and reducing the waist size. How? You take the amount you want to reduce - 2 further inches and divide that number by the number of seams which are "take inable" - 10 in this case. I don't take in the centre front seam or the centre back seam as these have to remain straight. So, 2 inches divided by 10 seams is 0.5cm reduction on each seam. As you can see, I have done this inside of the seam allowances for accuracy.

All 12 pieces of the corset are then laid on the fabric, cut and marked up. The two sides are kept separate, and I work on one side at a time.
This is a single layer corset, so the boning channels which are not over seams, are sewn on first. It's easier to do them 'flat' as when the peices are sewn together, there are curves to negotiate! I do not sew the channels nearest the front or back edges yet.

After all the 'flat chanels' are sewn on, I sew all the pieces of each side together. The reason I don't sew the bone channels over the seams right now, is because I need to be able to adjust the fitting if necessary at a later stage.

When working with satin it's best to pin in the seam allowances only. The curvy seams are then ironed over my tailors ham...

And here's both sides after pressing ..


Already a corset shape ... now it's time to do the front and back edges...

As the back edge will have 20 eyelets in each side and this is a single layer corset, I am re-inforcing the back facing with some fusible interfacing - just a precaution.

I like to top stitch all my edges VERY close to the edge, for extra strength and because I think it looks nice. For corsetry, I mainly use two machine feet - my zipper foot as you can see, and my applique foot, so that I can see where i'm going when sewing bone channels.

After sewing down the back facing, and making sure the final bone channels are in place (remember I didn't sew these at the beginning), I mark my eyelets using a template and chalk, on the right sides of the back edges of the corset. This one doesn't have enough holes in it - I need 20 holes on each side, this only has 10. I need to make a new one! After the positions are marked, I use an eyelet punch or an awl, or both, to make holes, and the eyelets are then inserted with a hammer. Mr Marmalade usually helps with this part.

When the eyelets at the back are done, I insert the busk fastner at the front. I always cover my busk first as this adds strength and a nicer finish - and if i'm a bit rusty, it's good practice before doing the real thing..

Now I can insert bones into the channels I have already sewn and try the corset on to check that it fits. This one needs a bit of adjustment around the boobs - the front two seams need to be taken in by 1cm each. The bust area is usually where the adjustments need to be made. Luckily the waist seems fine - certainly the shape is what I was after. So now, all I have to do is make the adjustments, and then finish off the boning and binding, which I will show you next time!


Saturday 10 October 2009

Simplicity 9769


This is the Simplicity 9769 pattern from one of my kits - just two seams to adjust and then the rest of the boning can go in - it needs about 10 more, and then some binding. I used about 1/3 metre of satin coutil - that's all I had dyed! The waist is 22 inches. 4 inches smaller than my natural waist (on a good day and a chocolate starved week!). I'm going to post up a 'quick guide' in the next few days...

Friday 9 October 2009

Dying corset satin

I've been experimenting ...

If my 'Tulip' dylon machine dye wasn't too keen on the white polycotton ...


It was positivly smitten with my white satin ..


and so am I! Just look at it! ...

It makes me ooooh and ahhhhhh every time I look at it - and not without a great deal of stroking ..

Next post I shall show you, step by step, what i've done with it ..